
Radiator leaking from the valve
A radiator leaking at the valve is almost always one of two things: a loose union nut where the pipe meets the valve, or worn packing inside the valve spindle.
The first is a two-minute fix with an adjustable spanner. The second needs the valve re-packed or replaced. Both are far cheaper than a leaking radiator body.
Why is my radiator leaking from the valve?
Five things fail at a radiator valve, and each leaks from a slightly different place:
| Cause | Where it leaks | How you know | Fix |
| Loose union nut | Where pipe meets valve | Drip appears as the system heats up | Tighten a quarter turn |
| Worn spindle packing | Top of valve, around the head | Gets worse when you turn the valve | Re-pack or replace |
| Failed valve body | The valve itself, constantly | Wet even with the heating off | Replace the valve |
| Crushed olive | Around the compression joint | Started after recent plumbing work | Plumber — replace olive |
| Corroded thread | Below the valve | Green or white crust visible | Plumber — repipe |
Prices vary by region and access. See the full breakdown of radiator repair costs for more detail.
How to stop a radiator valve leak
Start with the simplest fix. Most valve leaks stop here:
- Turn the heating off and let the radiator go cold
- Put a container and towels under the valve
- Identify the exact leak point — top of the valve, the union nut, or below it
- Hold the valve body still with one spanner and turn the union nut a quarter turn with another
- Dry everything and wait thirty minutes
- If it's still dripping, close both valves to isolate the radiator
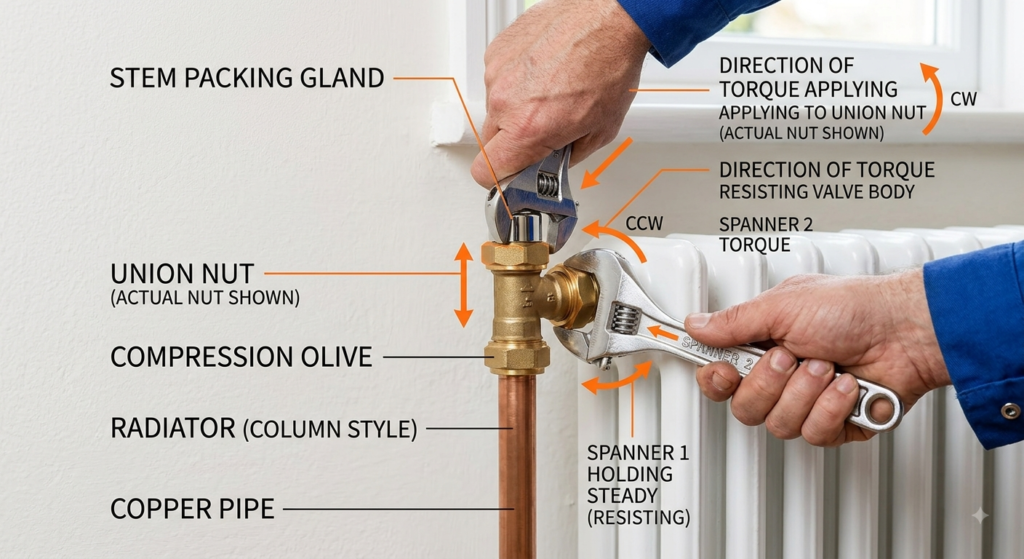
Two spanners matter. Turning the nut without holding the body twists the pipework, and you can turn a drip into a proper leak.
A quarter turn is the whole instruction. Overtightening crushes the olive inside the joint, and then it needs a plumber.
What you'll need
- Two adjustable spanners — one to hold, one to turn
- PTFE tape — for re-sealing threads
- A container and old towels
- A radiator bleed key — for rebalancing afterwards
Nothing here costs more than a few pounds, and you'll use all of it again.
Leaking from the top of the valve
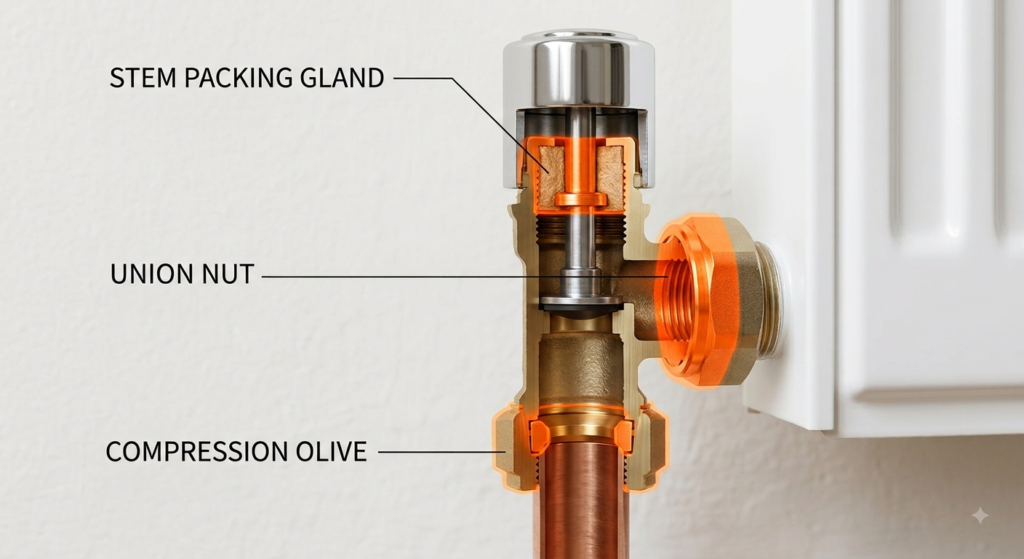
Water appearing around the valve head, rather than at the pipe below it, points to the spindle packing — a small gland that seals the moving shaft inside the valve.
The giveaway: it gets noticeably worse when you turn the valve, and may stop almost entirely when it's left alone. That's because turning the spindle drags water past a seal that's no longer gripping.
On some valves the gland nut can be tightened a fraction, which buys time. On most modern TRVs the packing isn't serviceable and the valve gets replaced. Either way, the system has to be isolated first.
Leaking from below the valve
If the water is coming from the joint where the pipe enters the valve, it's the compression fitting. Inside it there's a small brass ring — the olive — squashed between nut and pipe to make the seal.
A quarter turn on the union nut fixes most of these. If it doesn't, the olive is deformed and needs replacing, which means draining that section of pipework. That's a plumber's job.
One thing to check first: whether the leak only appears when the heating is running. Pipes expand as they warm, and a joint that's marginal when cold can open up when hot. Same fix, but it explains why the drip seems to come and go.
Green or white crusting around the joint is a different signal. That's corrosion on the thread, and tightening will make it worse.
When to call a plumber
Stop and call someone if any of these apply:
- The leak continues after tightening
- There's visible corrosion on the valve or the pipe thread
- Water is reaching electrics, a ceiling, or a floor below
- The radiator body itself is weeping, not the valve
- You'd need to drain the system to get at it
A valve replacement is an hour's work for a plumber and it's done properly. Persisting with a spanner on a corroded fitting usually ends with a bigger bill.
What it costs to fix
| Job | Typical UK cost | Time |
| Tighten a leaking valve | £60 – £100 | 30 min |
| Re-pack a valve gland | £80 – £120 | 45 min |
| Replace one radiator valve | £90 – £150 | 1 hour |
| Replace both valves | £140 – £220 | 1.5 hours |
| Emergency call-out | £150 – £300 | — |
Replacing both valves at once usually costs less than doing them separately six months apart. If one has failed and the other is the same age, it's worth asking.
Prices vary by region and by how easy the valve is to reach. See the full breakdown of radiator repair costs for more detail. Prices checked August 2026.
More radiator problems
Valve leaks are the common case. These cover the ones that aren't.
Frequently asked questions
Why is my radiator leaking from the valve?
Usually a loose union nut or worn spindle packing. If the leak is worse when you turn the valve, it's the packing. If it appears as the system heats up, it's the nut.
Can I fix a leaking radiator valve myself?
Often, yes. Tightening a union nut a quarter turn with two spanners fixes most valve leaks. Replacing a valve means draining the system, which is a plumber's job.
How tight should a radiator valve be?
A quarter turn past hand-tight. Overtightening crushes the olive inside the joint and turns a small drip into a real leak.
Is a leaking radiator valve dangerous?
Not directly — it's water, not gas. The risk is water damage to floors and ceilings, and losing enough system pressure that the boiler locks out.
Why does my radiator only leak when the heating is on?
Pipes expand as they warm. A joint that seals when cold can open slightly when hot. Tighten a quarter turn and monitor it over a full heating cycle.
How much does it cost to replace a radiator valve?
£90 to £150 for one, £140 to £220 for both. Doing both at once is usually cheaper than two separate visits.
A valve that has been leaking for a while often leaves the radiator cold at the bottom as well — worth checking once the leak is fixed.